UI SDK - Vanilla Javascript integration
SDK library integration
The Amberflo UI Kit SDK is a development kit built with Vanilla JavaScript, designed to let you embed core Amberflo views for a specific customer directly on your own website.
While the SDK uses React behind the scenes, it does not require your project to be built with React. It wraps the React UI Kit and handles everything internally.
The SDK is responsible for making the necessary API calls and rendering the components into a specified <div> element in your HTML.
📘 Requisites
These are some of the languages where the SDK can be used: in React, Javascript, Angular, Vue.
Getting Started
1.Include the script in the <head> of your site:
<script
  type="module"
  src="https://js.amberflo.io/index.1.0.30.js">
</script>
📘 Make sure to use to the latest available version in the script (e.g.: 1.0.30). You can check versions under Releases section.
2. Retrieve your session token to access Amberflo API endpoints. With that session id, you will need to make a new instance of the AmberfloSDK included on the script above. To do that, you will have to add this code snippet under the first script tag you added:
<script>
  window.onload = () => {
    amberflo = new AmberfloSDK("{{YOUR_SESSION_TOKEN}}");
  };
</script>
📘Replace {{YOUR_SESSION_TOKEN}} with the token you got. For example, if you received a session token that was 1234abcd, you would instantiate the Amberflo SDK like so: amberflo = new AmberfloSDK("1234abcd"). To know more about how to get your session token read Get Session Token.
3. Since sessions can expire, on your new instance of AmberfloSDK there is a method to set the new sessionId. You can call it anytime to amberflo.setSessionId("{{YOUR_NEW_SESSION_TOKEN}}");. The app will continue to work the same with the same ID.
4. To add a new Amberflo view, you will need to place a <div> on your code, with the class amberflo and a data-amberflo-type attribute to setup the element. This data-amberflo-type attribute is responsible for rendering the different views that we support.
You can further personalize each component by adding attributes to the <div>:
- data-amberflo-colors – Set a HEX or color name to define the primary brand color. Defaults to Amberflo's color palette.
- data-amberflo-font-size – Set a base font size (e.g., 16). Component fonts will scale proportionally.
- data-amberflo-font-family – Provide a comma-separated list of fonts. The browser will use the first available font.
- data-amberflo-font-custom – Import a Google Font if it’s not already supported. This must be used together with data-amberflo-font-family.
- data-amberflo-with-container – "true" or "false". If "true", a container box is displayed around the widget.
- data-amberflo-with-title – "true" or "false". If "true", the widget title is shown (container must also be enabled).
- data-amberflo-title – Set a custom title for the widget. If omitted, the default title is used.
All customization attributes are optional. If not specified, Amberflo’s default design system will be applied.
<div
  class="amberflo"
  data-amberflo-type="usage-table"
  data-amberflo-colors="#1565c0"
  data-amberflo-font-size="16px"
  data-amberflo-font-family="Roboto, Helvetica, Arial, serif"
  data-amberflo-font-custom="https://fonts.googleapis.com/css2?family=DynaPuff:wght@400;500&family=Great+Vibes&family=Rubik&display=swap"
  data-amberflo-with-container="true"
  data-amberflo-with-title="true"
  data-amberflo-title="Custom Title"
></div>
Some views may require additional attributes depending on the data they display. These attributes can be updated programmatically at any time to render a different view or change the current state. For example, you can initially display a Usage Table for one meter and then update the view dynamically—such as when a user clicks a button—to show data for a different meter without reloading the page.
Get Session Token
To interact with Amberflo—whether through the API or the AmberfloSDK—you must first create a session token.
The recommended approach is to retrieve this token from a backend endpoint on your server using the browser’s fetch function on the client side. This method works particularly well for single-page applications, especially those built with modern frontend frameworks like React.
For more information check out our Create a session API
This example shows how to create the server endpoint that serves the client secret:
const express = require('express');
const app = express();
const request = require('request');

app.get('/amberflo-session', async (req, res) => {
  request({
    method: 'POST',
    uri: 'http://app.amberflo.io/session',
    body: {
      "customerId": "{{DESIRED_CUSTOMER_ID}},
      "expirationEpochMilliSeconds": {{EXPIRATION_DATE_IN_MILLISECONDS}}
    },
    headers: {
      "X-API-KEY": "{{YOUR_API_KEY}}"
    }
  }, function (error, response, body) {
        if (!error && response.statusCode == 200) {
            res.json({ sessionToken: response.sessionToken })
        }
    }
  );
})
📘 The above example is in Node.js.
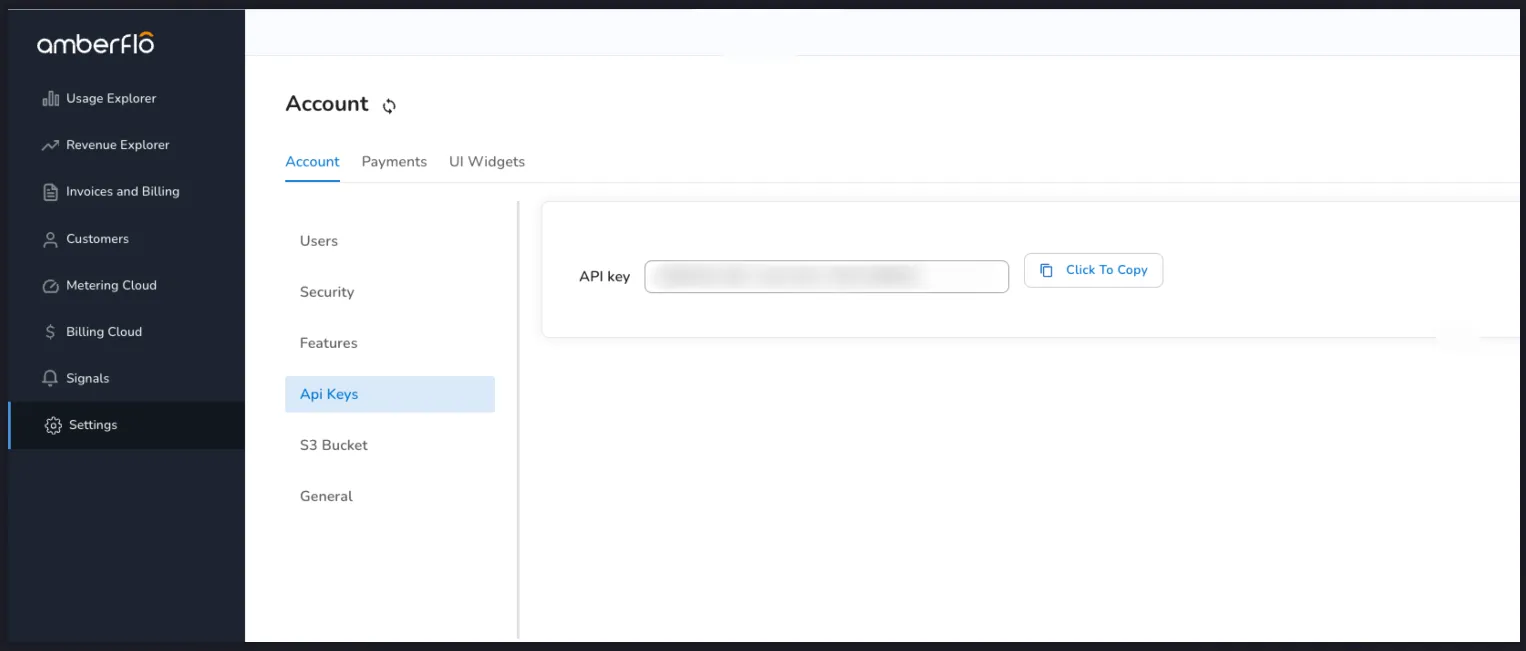
You can get X-API-KEY from the Amberflo site inside Settings -> Account Configurations -> API keys.
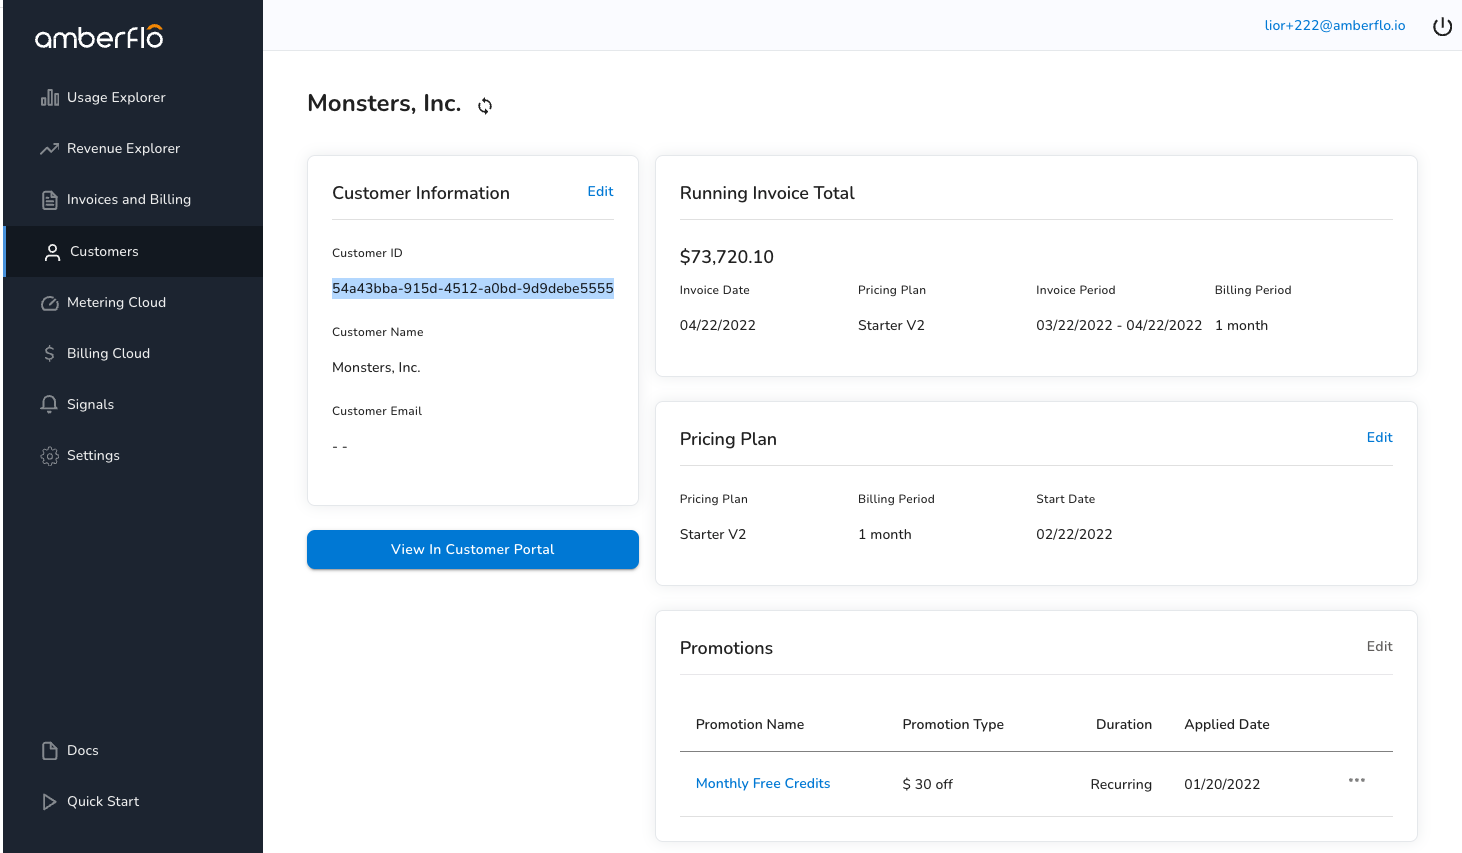
You can also get the customerId from Amberflo site inside Customers → Click on one customer → Copy Customer ID.
This example demonstrate how to fetch the session token with JavaScript in the client side:
const response = fetch('/amberflo-session').then(function(response) {
  return response.json();
}).then(function(responseJSON) {
  const sessionToken = responseJson.sessionToken
})
Using an Event
As you explore the Available Views , you’ll notice that some of them support events. For example, the Usage Table view includes a datechange event that fires when the date is changed using the date picker.
These events give you the flexibility to trigger additional actions in your app whenever a supported interaction occurs within an Amberflo view.
Here is an example of how to use an event using the datechange event with the Usage Table view:
<div
  id="usage-table"
  class="amberflo"
  data-amberflo-type="usage-table"
  data-amberflo-meters="SampleMeter"
></div>

<script>
  window.onload = () => {
    after setting up your session token...
    document
      .getElementById("usage-table")
      .addEventListener("datechange", (event) => {
        console.log(event.details);
        // { startDate: 1670112000000, endDate: 1672779539731 }
      });
  };
</script>
Invoice-related Options
Several views in Amberflo—such as the Invoices List and Invoice Details—display invoice-related data. You can customize how this data appears by adjusting settings under Amberflo → Settings → Invoice.
There are currently two configurable options:
Displaying cached invoices You can choose whether the data shown in invoice views is retrieved in real-time or from a cached version. Using cached data helps improve performance and speeds up invoice rendering.
Grouping product items on invoices Amberflo allows you to organize product items into categories. These categories appear on the invoice to make it easier to understand grouped usage and charges.
SDK Versions
📘 Releases
01/19/2024 - Version 1.0.30 01/16/2024 - Version 1.0.29 01/10/2024 - Version 1.0.28 08/04/2023 - Version 1.0.27 08/04/2023 - Version 1.0.26 07/12/2023 - Version 1.0.25 02/06/2023 - Version 1.0.24 01/09/2023 - Version 1.0.23 12/27/2022 - Version 1.0.22 12/20/2022 - Version 1.0.21 12/15/2022 - Version 1.0.20 12/08/2022 - Version 1.0.19 11/24/2022 - Version 1.0.18 10/20/2022 - Version 1.0.17 10/12/2022 - Version 1.0.16 10/04/2022 - Version 1.0.15 09/14/2022 - Version 1.0.14 09/12/2022 - Version 1.0.13 09/01/2022 - Version 1.0.12 08/29/2022 - Version 1.0.11 07/29/2022 - Version 1.0.10 07/12/2022 - Version 1.0.9 07/07/2022 - Version 1.0.8 07/06/2022 - Version 1.0.7 06/07/2022 - Version 1.0.6 05/09/2022 - Version 1.0.5 05/07/2022 - Version 1.0.4 04/26/2022 - Version 1.0.3 04/21/2022 - Version 1.0.2 04/20/2022 - Version 1.0.1 04/13/2022 - Version 1.0.0
Available Views
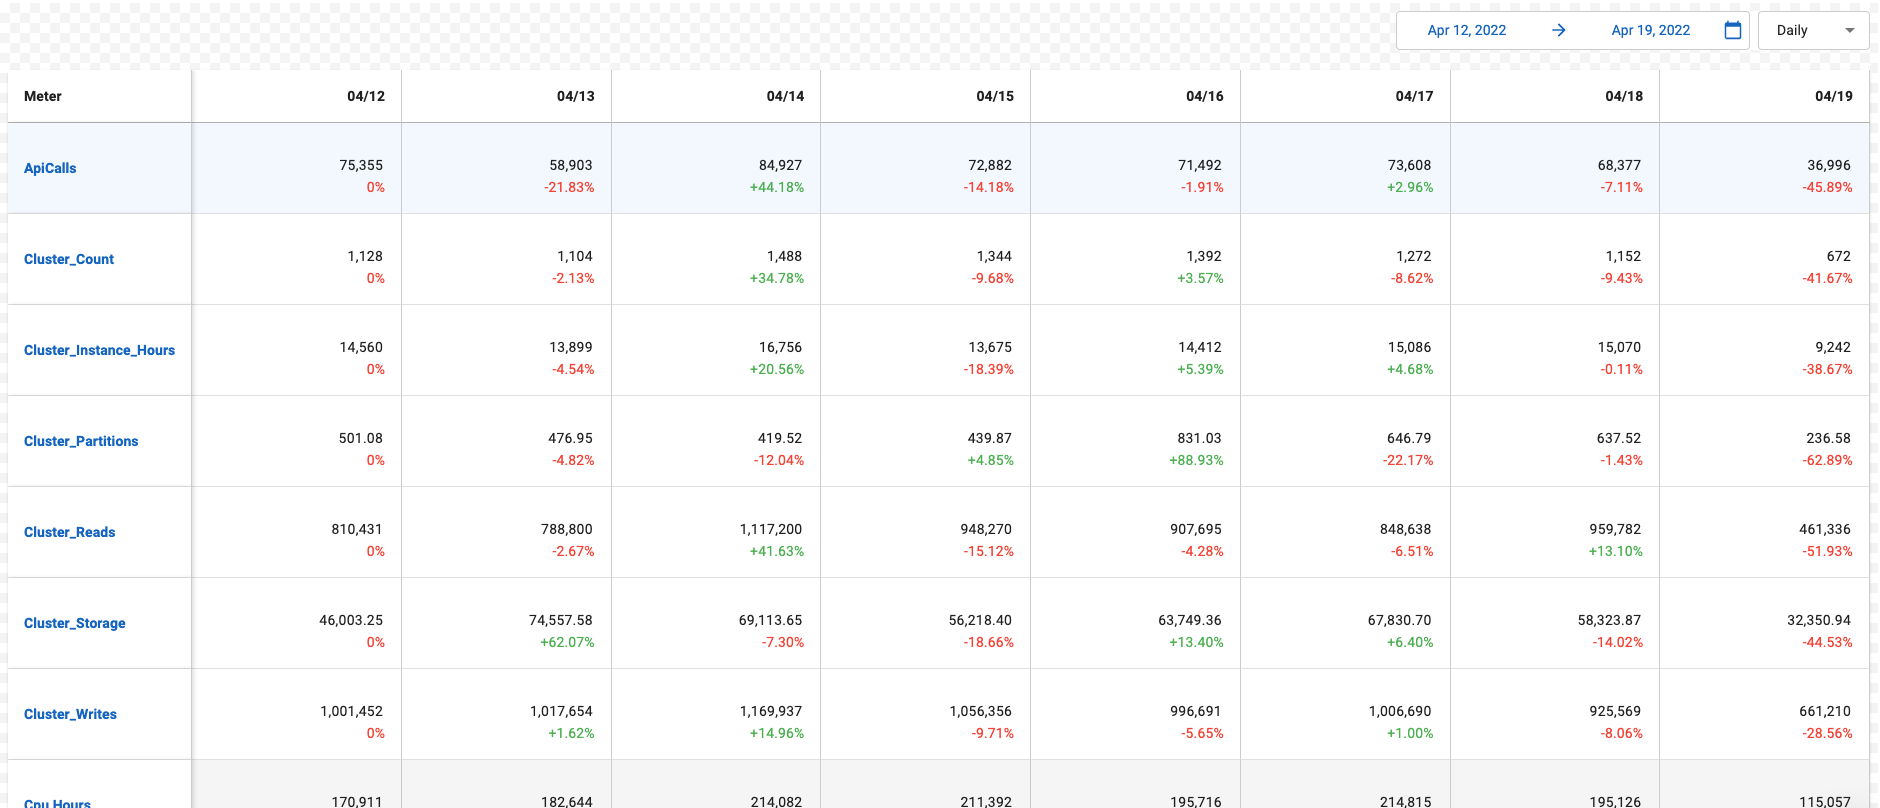
Usage Table
Attribute | Value |
|---|---|
data-amberflo-type | usage-table |
data-amberflo-meters | Comma separated meters apiNames you want to see on the table. e.g.: ApiCalls,cluster_count,cluster_instance_hours,cluster_partitions,cluster_reads,cluster_storage,cluster_writes,CpuHours,DataVolumeGb,number_of_runs |
| |

Example:
<div
  class="amberflo"
  data-amberflo-type="usage-table"
  data-amberflo-meters="ApiCalls,cluster_count,cluster_instance_hours,cluster_partitions,cluster_reads,cluster_storage,cluster_writes,CpuHours,DataVolumeGb,number_of_runs"
></div>
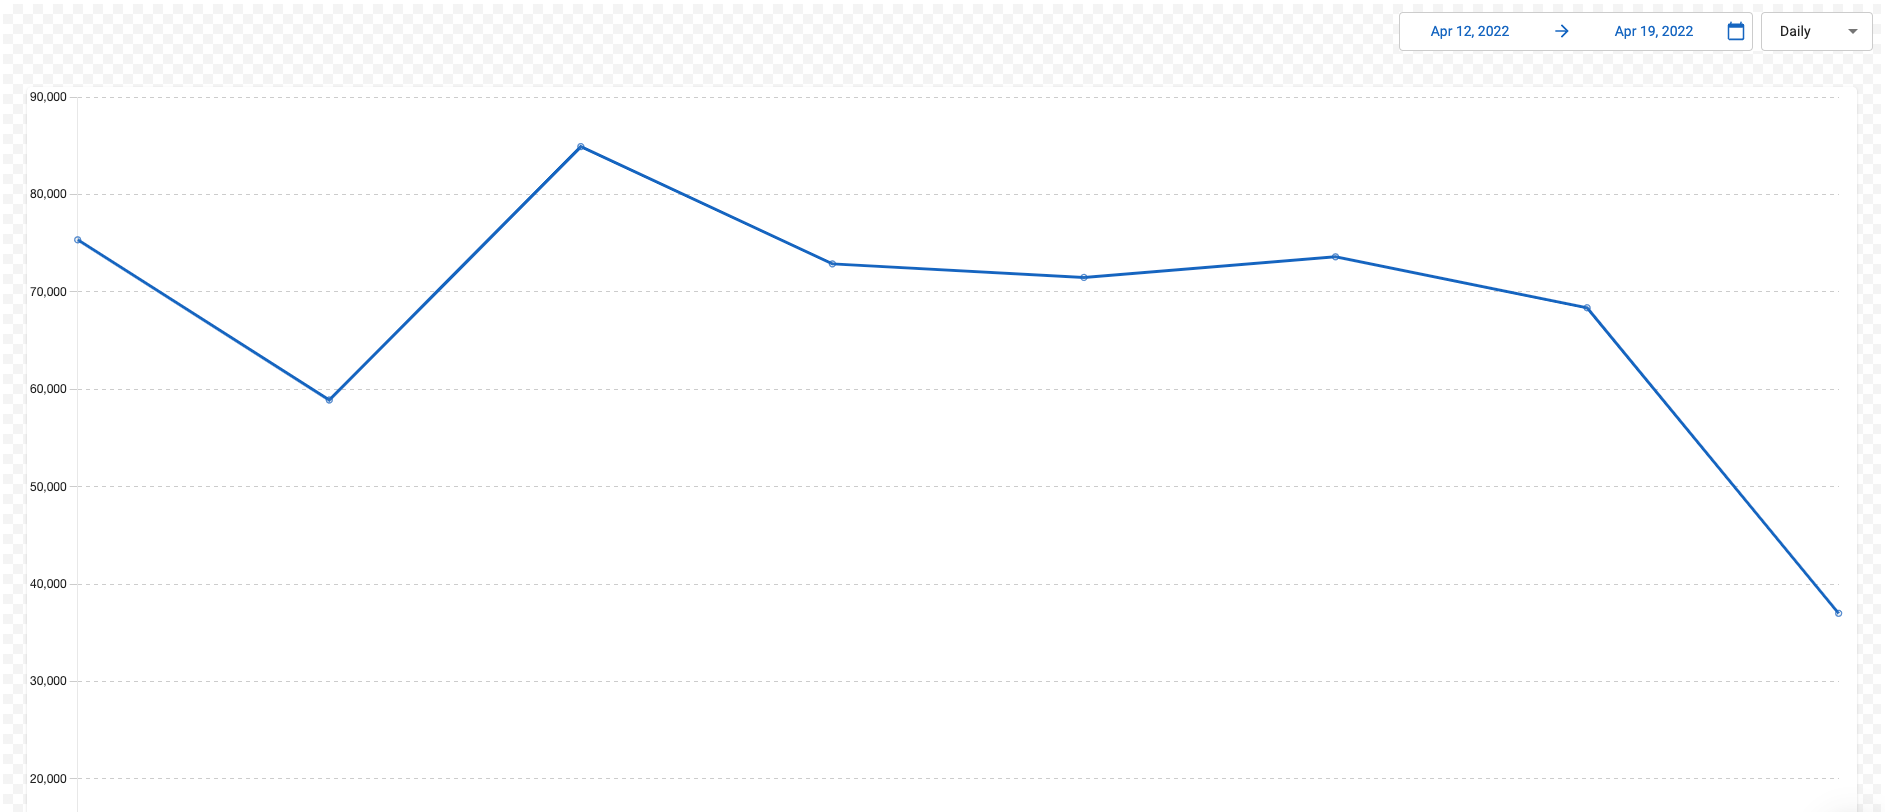
Usage Graph
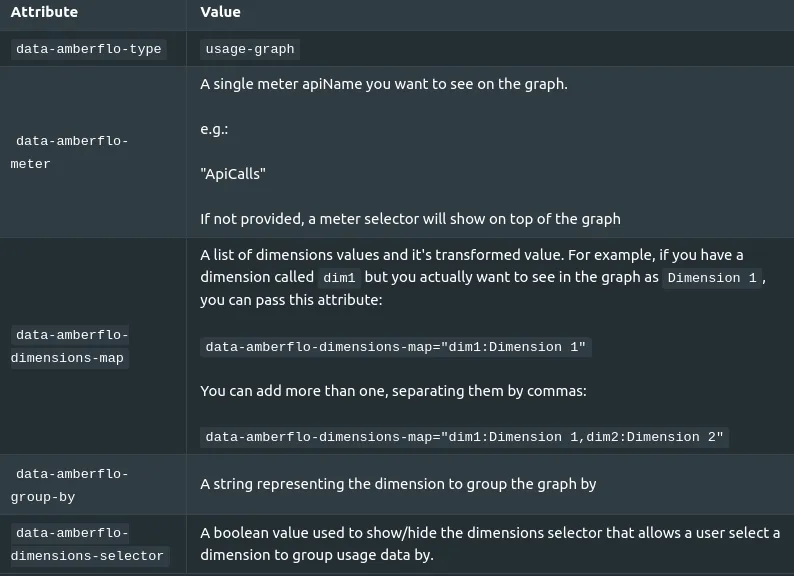
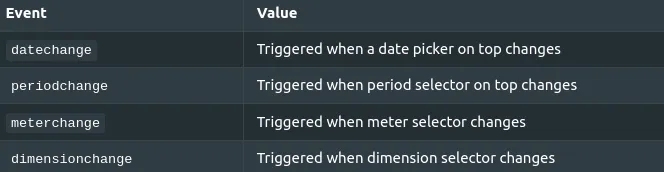
Example
<div
  class="amberflo"
  data-amberflo-type="usage-graph"
  data-amberflo-meter="ApiCalls"
></div>
Cost Table
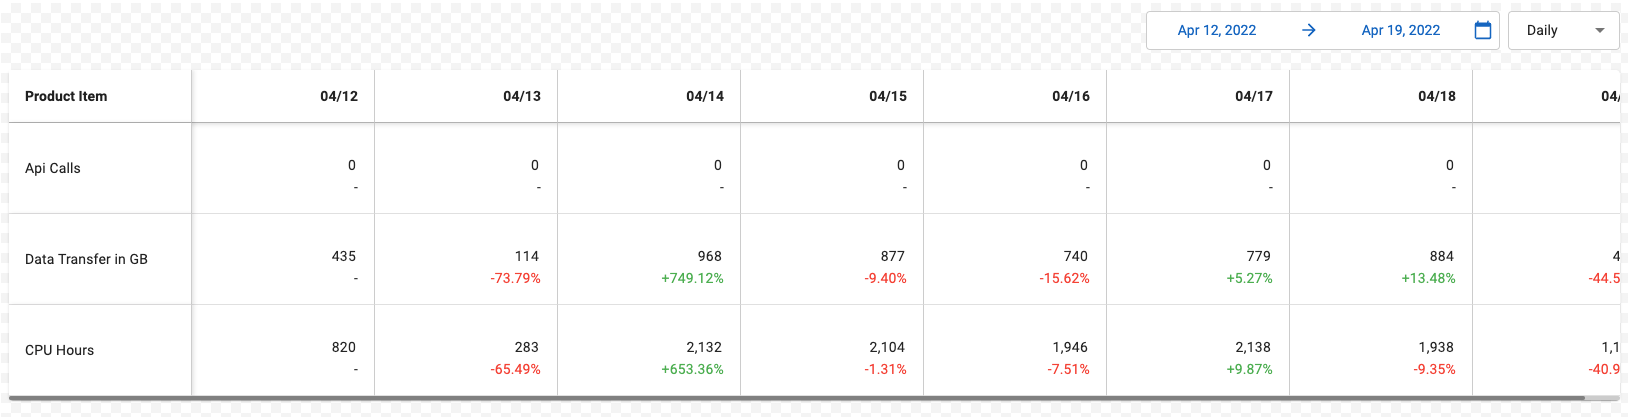


Example
<div
  class="amberflo"
  data-amberflo-type="cost-table"
></div>
Invoice Details
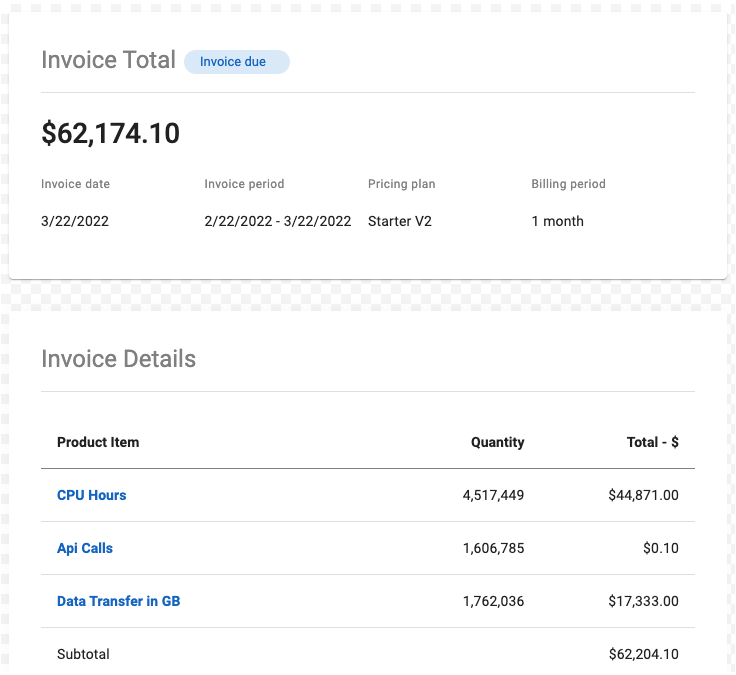
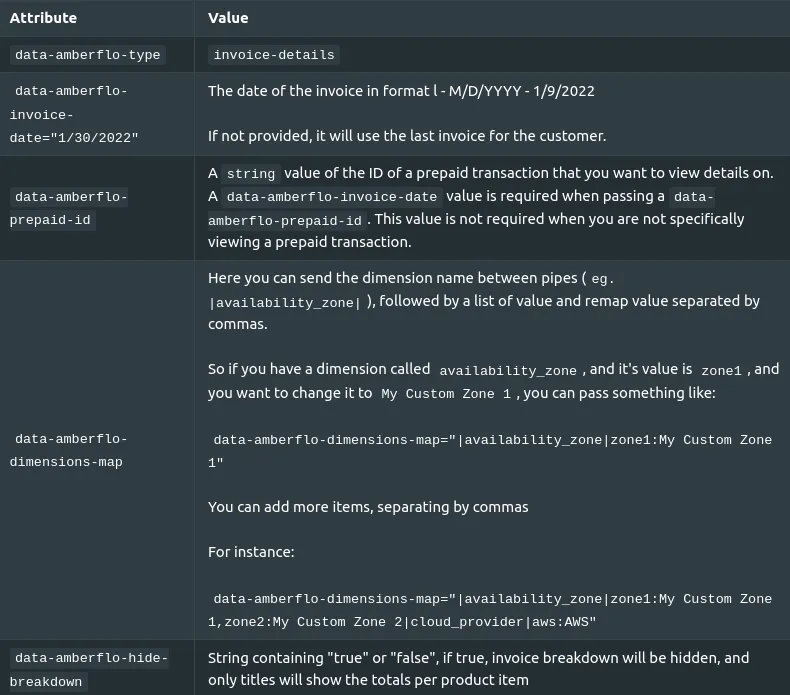
Example
<div
  class="amberflo"
  data-amberflo-type="invoice-details"
  data-amberflo-invoice-date="1/9/2022"
></div>
Invoices List
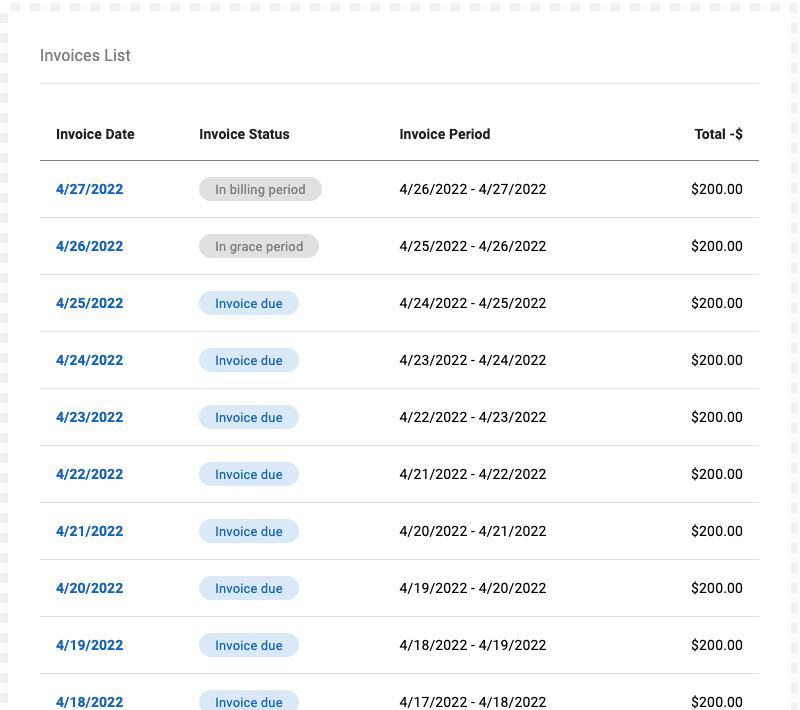
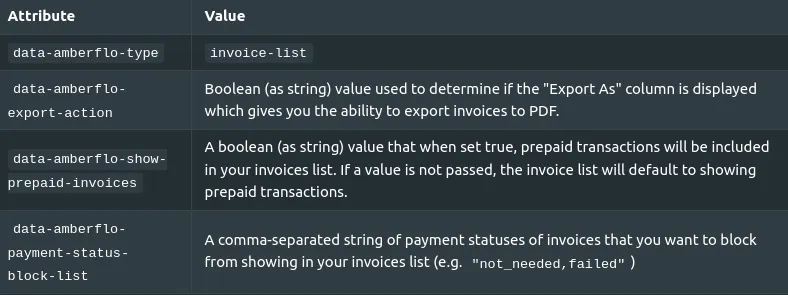

Example
<div
  class="amberflo"
  data-amberflo-type="invoices-list"
></div>
Orders Usage Graph and Table
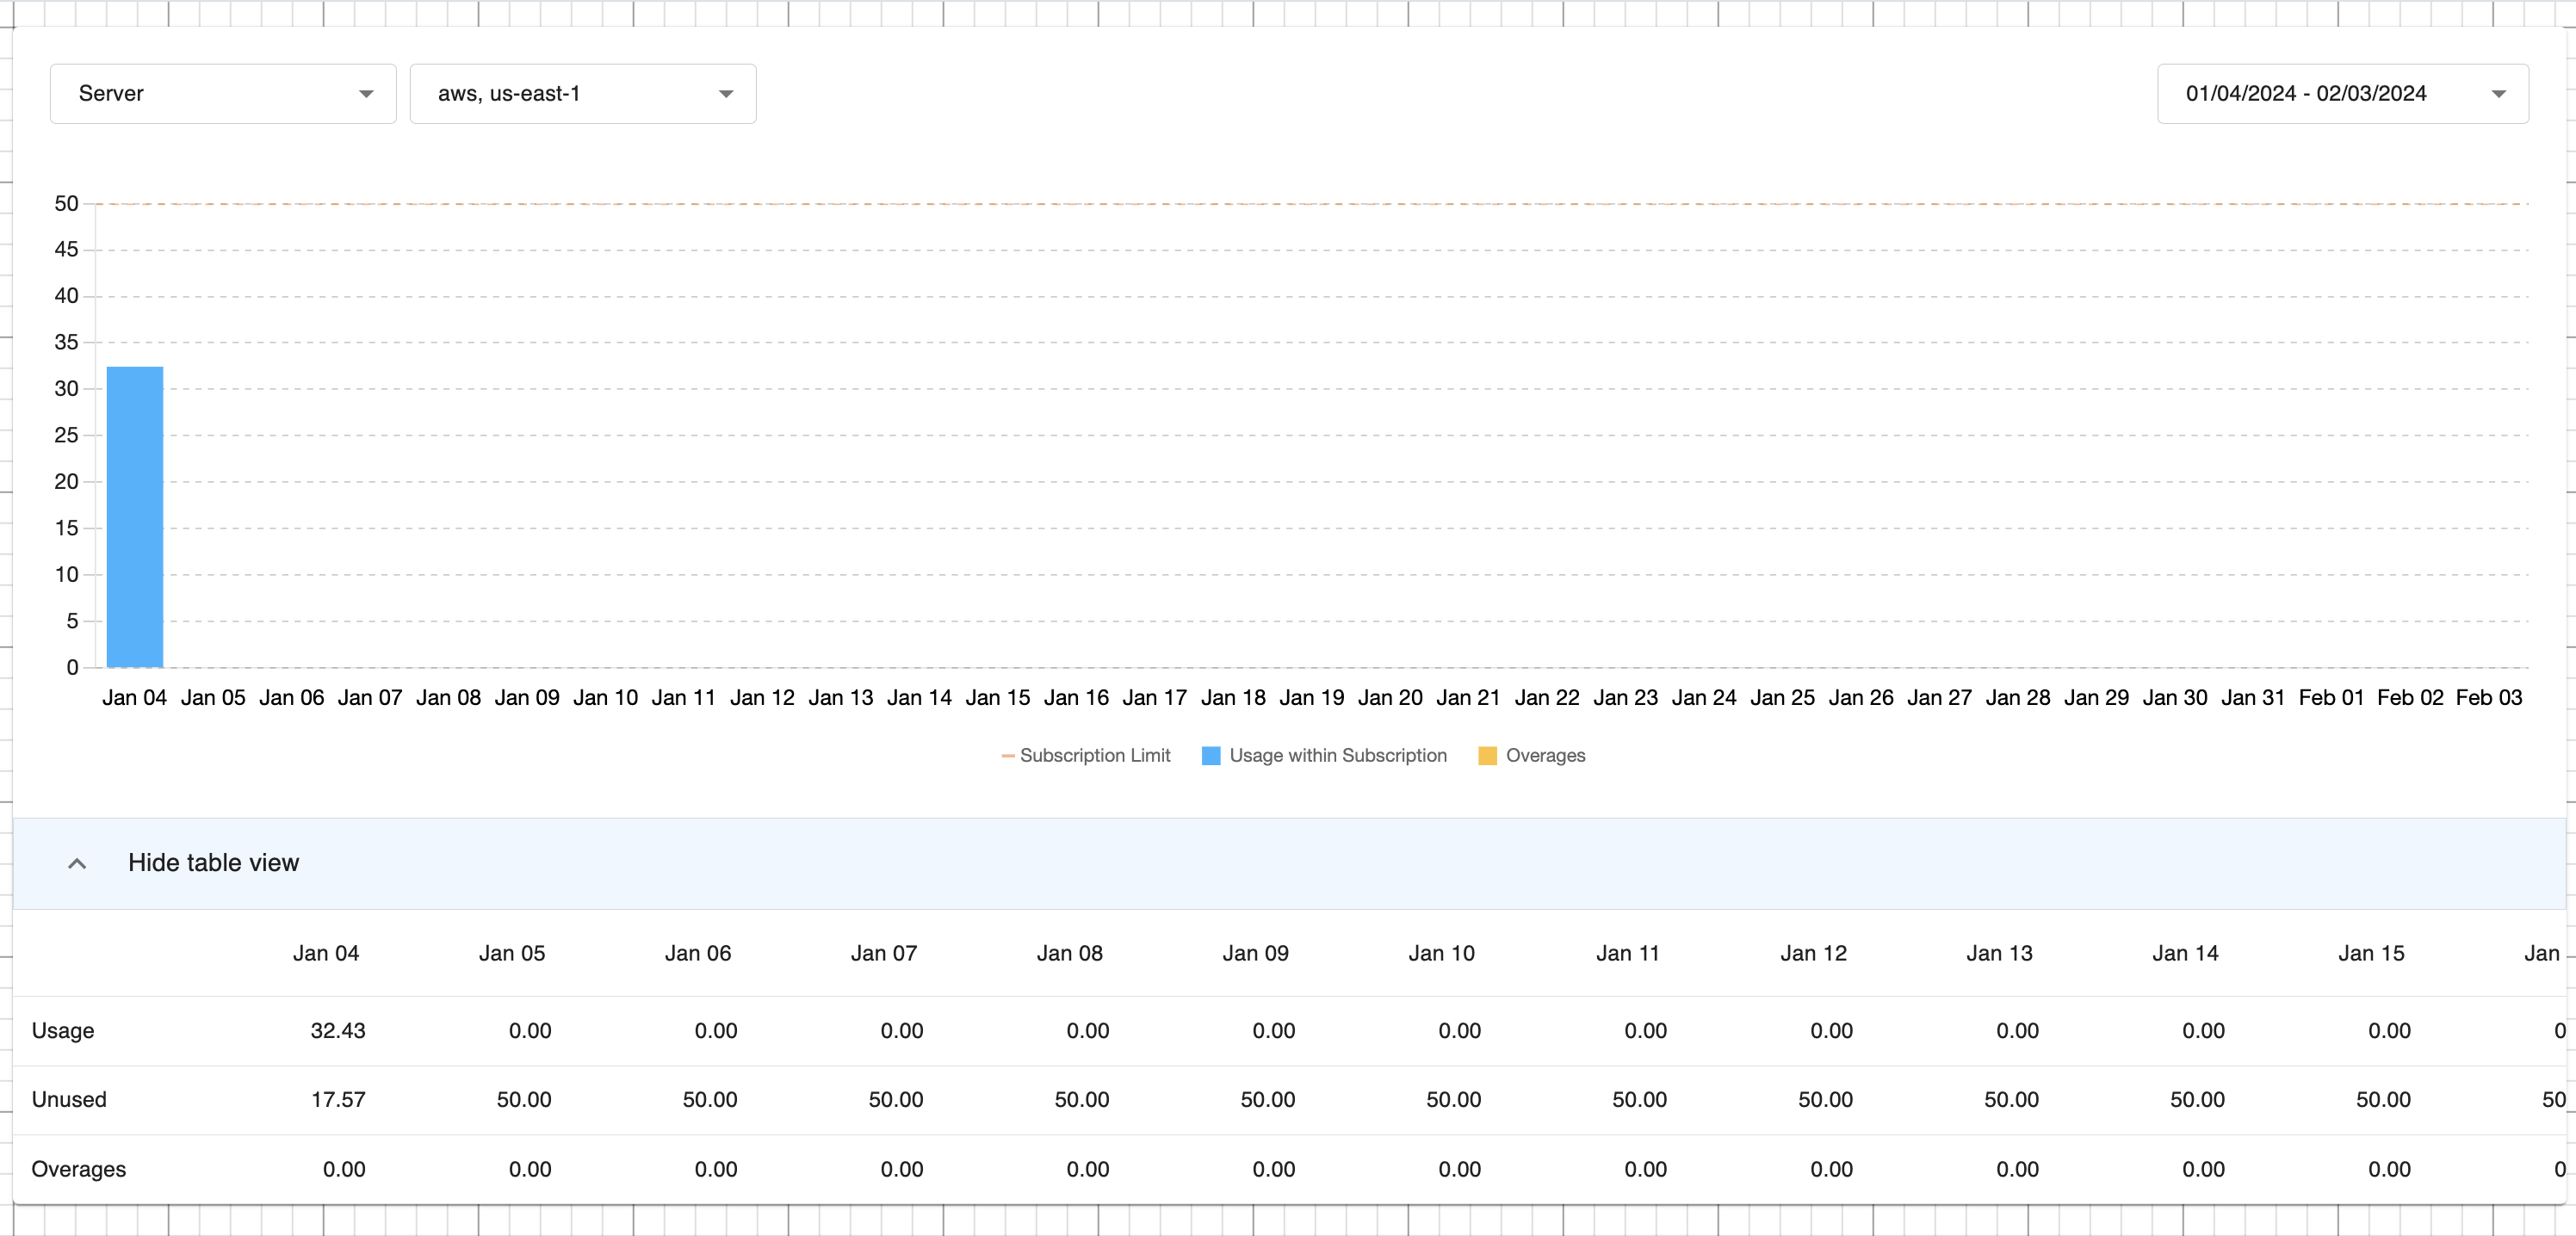

Example
<div
  class="amberflo"
  data-amberflo-type="order-usage-graph-table"
></div>
Prepaid Summary
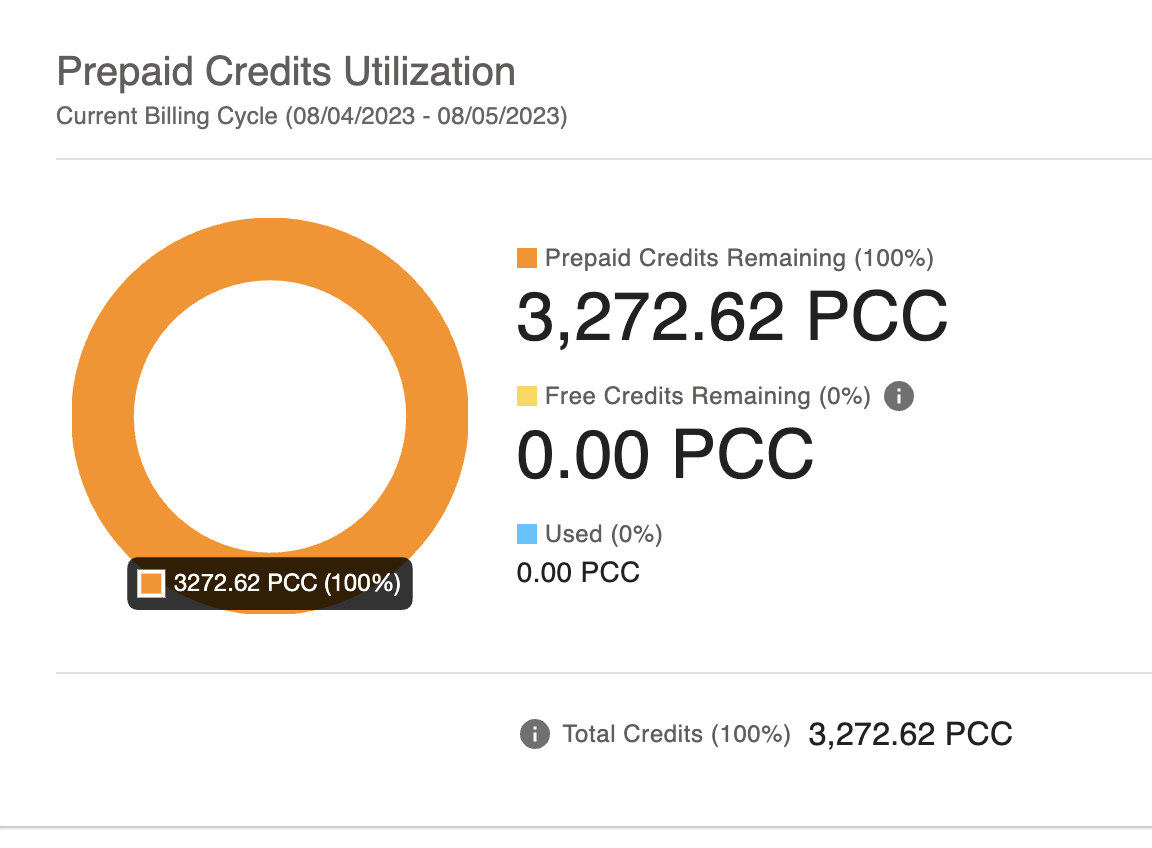

Example
<div
  class="amberflo"
  data-amberflo-type="prepaid-summary"
></div>
Prepaid Wallet
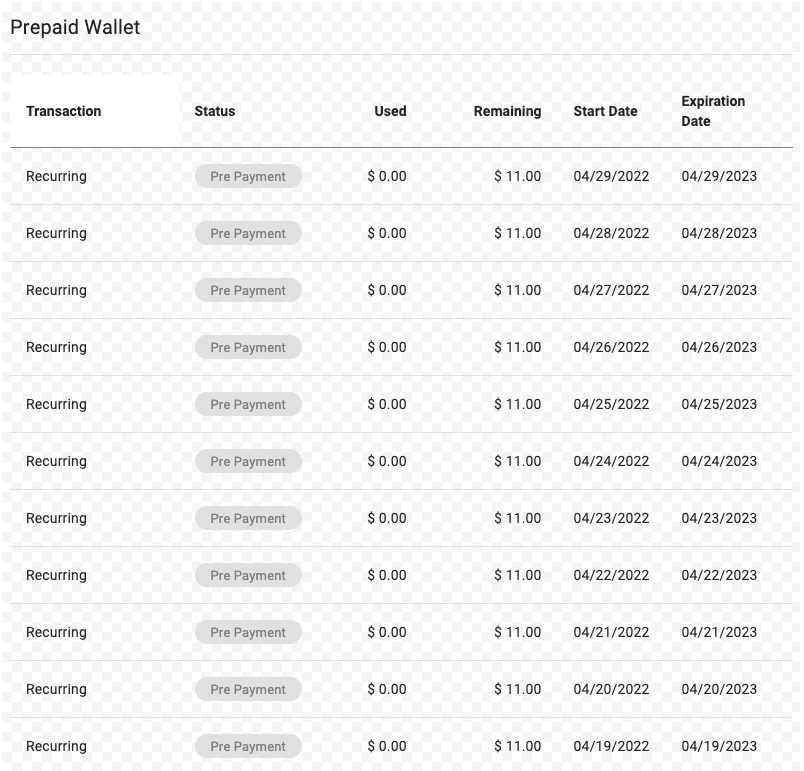

Example
<div
  class="amberflo"
  data-amberflo-type="prepaid-table"
></div>
Stripe Payment Method

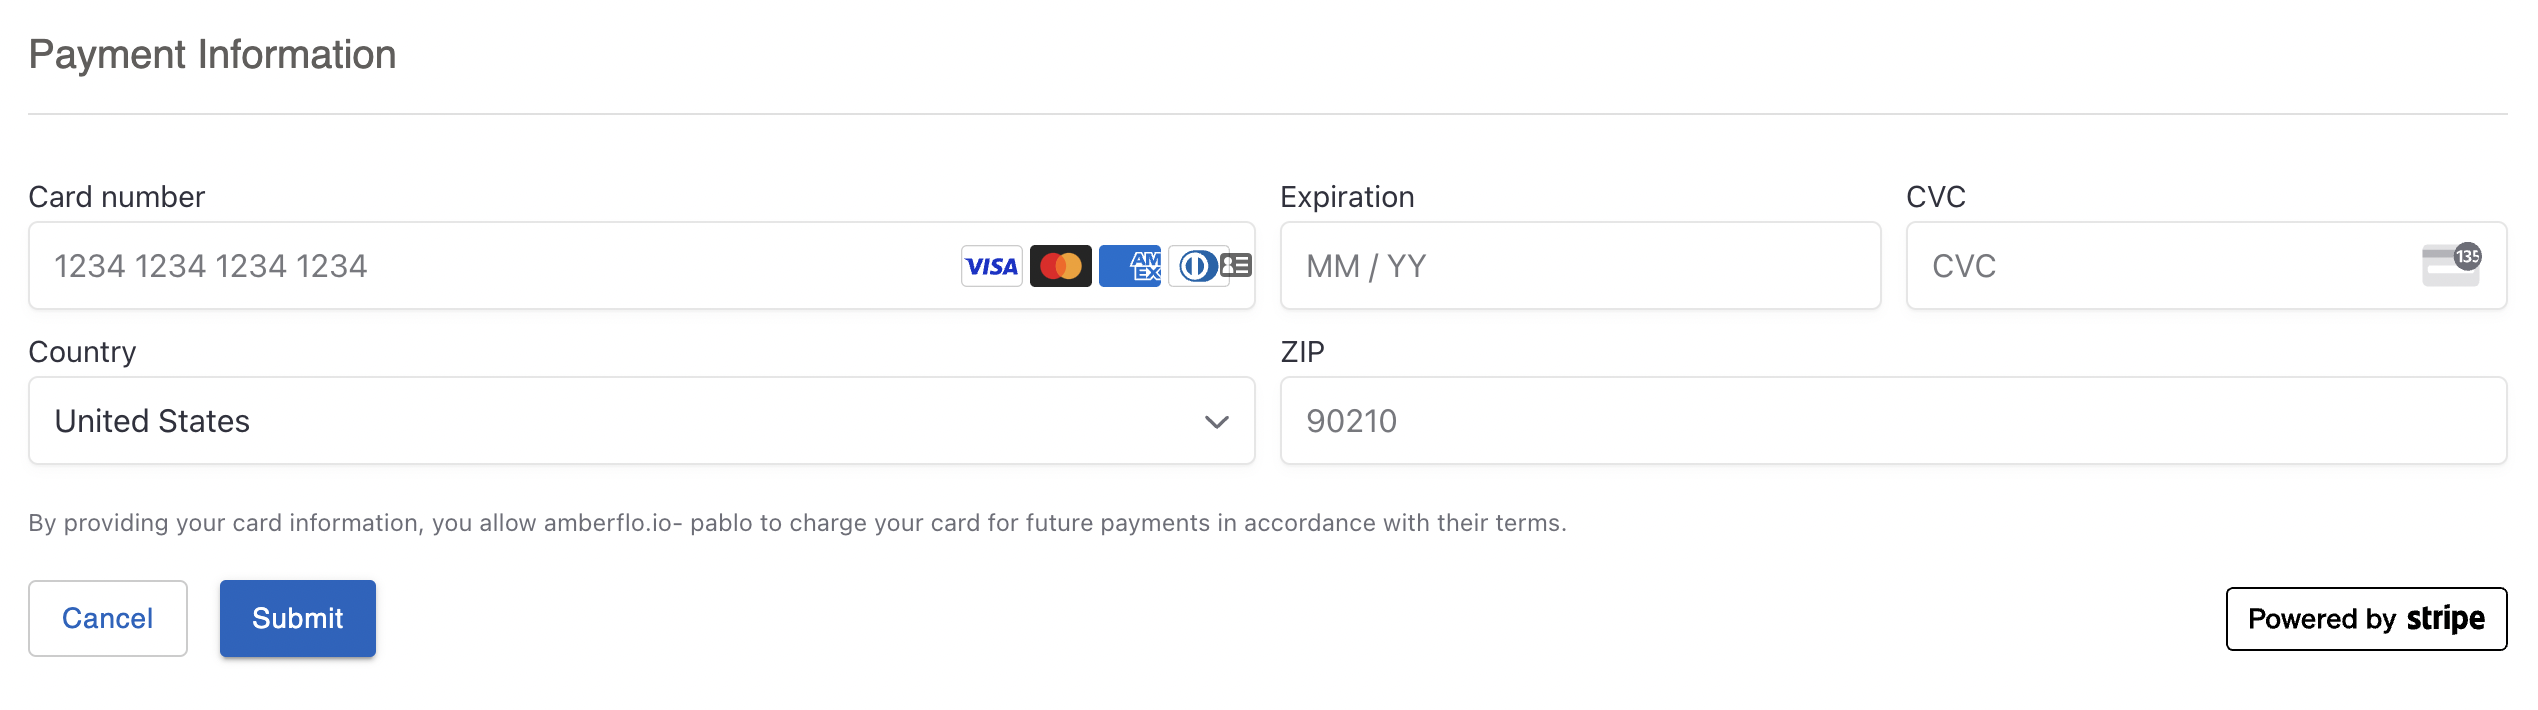
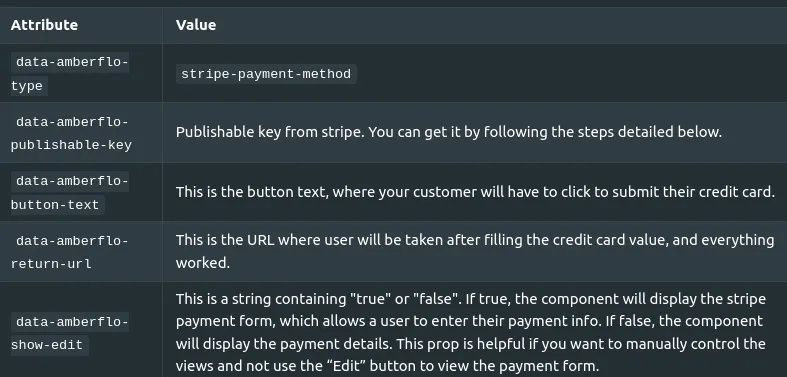
<div
  class="amberflo"
  data-amberflo-type="stripe-payment-method"
  data-amberflo-publishable-key="pk_test_62MIq3eFMMJsb2ZF6ivl10ycy6kVNhPau9QnrwJE649HGEEz3vZNDo5XA5I6ZdHRosbjGq8eAGPBrE0wrl7Q0Fxn1i00CaNu0Ar"
  data-amberflo-button-text="Submit"
  data-amberflo-return-url="https://mysite.com/stripe"
  data-amberflo-colors="#1565c0"
></div>
Notes
Ensure that the page specified in data-amberflo-return-url includes the Amberflo script and properly initializes the SDK, just like the page where the component is originally hosted. This ensures continuity in rendering and functionality when the user is redirected.
Add the script:
<script
  type="module"
  src="https://js.amberflo.io/index.1.0.24.js"
></script>
And make sure you instantiate it:
<script>
  window.onload = () => {
    amberflo = new AmberfloSDK("{{YOUR_SESSION_TOKEN}}");
  };
</script>
Pricing Plan
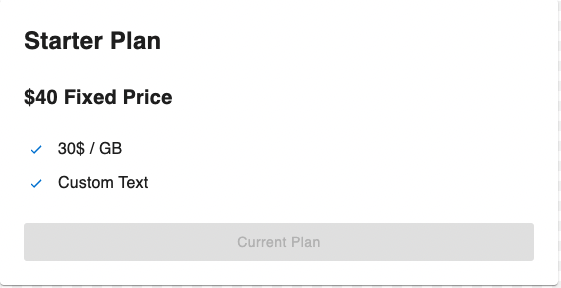
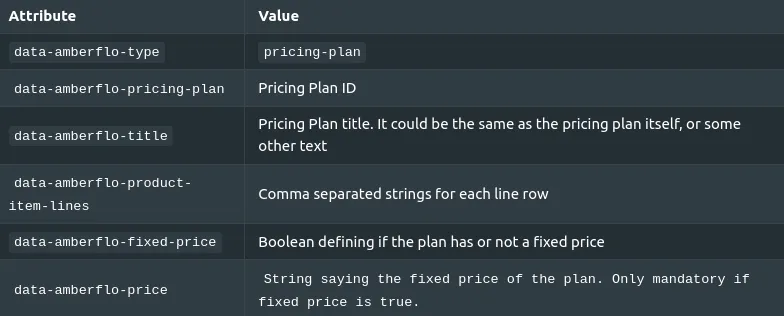

<div
  class="amberflo"
  data-amberflo-type="pricing-plan"
  data-amberflo-pricing-plan="65ad692f-b7ae-4886-ab8a-3d0146d0817d"
  data-amberflo-title="Plan Name"
  data-amberflo-product-item-lines="30$ / GB,Custom  Text"
  data-amberflo-fixed-price="true"
  data-amberflo-price="$40 Fixed Price"
  data-amberflo-colors="#0078D4"
></div>
Included Units

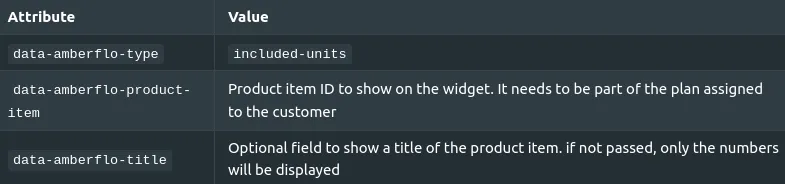
Order List



Example:
<div
  id="orderList"
  class="amberflo"
  data-amberflo-type="order-list"
></div>

<script>
  document.getElementById("orderList").addEventListener("addorder", (event => {
    // Do something when add order button is pressed. For instance:
    window.location.href = `/add-order/${event.detail}`
  });

  document.getElementById("orderList").addEventListener("rowclick", (event => {
    // Do something when an order row is clicked. For instance:
    window.location.href = `/order-details/${event.detail.id}`
  });
</script>
Order Details
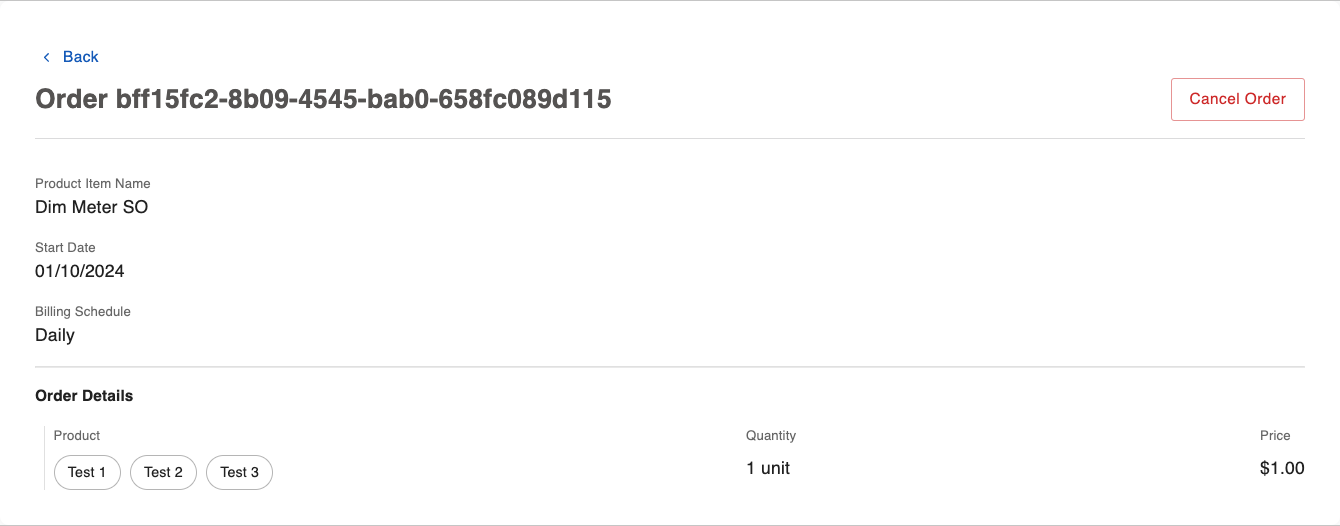


<div
  id="orderDetails"
  class="amberflo"
  data-amberflo-type="order-details"
  data-amberflo-order-id="65ad692f-b7ae-4886-ab8a-3d0146d0817d"
></div>

<script>
  document.getElementById("orderDetails").addEventListener("back", (event => {
    // Do something when back button is pressed. For instance:
    window.location.href = "/order-list"
  });
</script>
Order Create
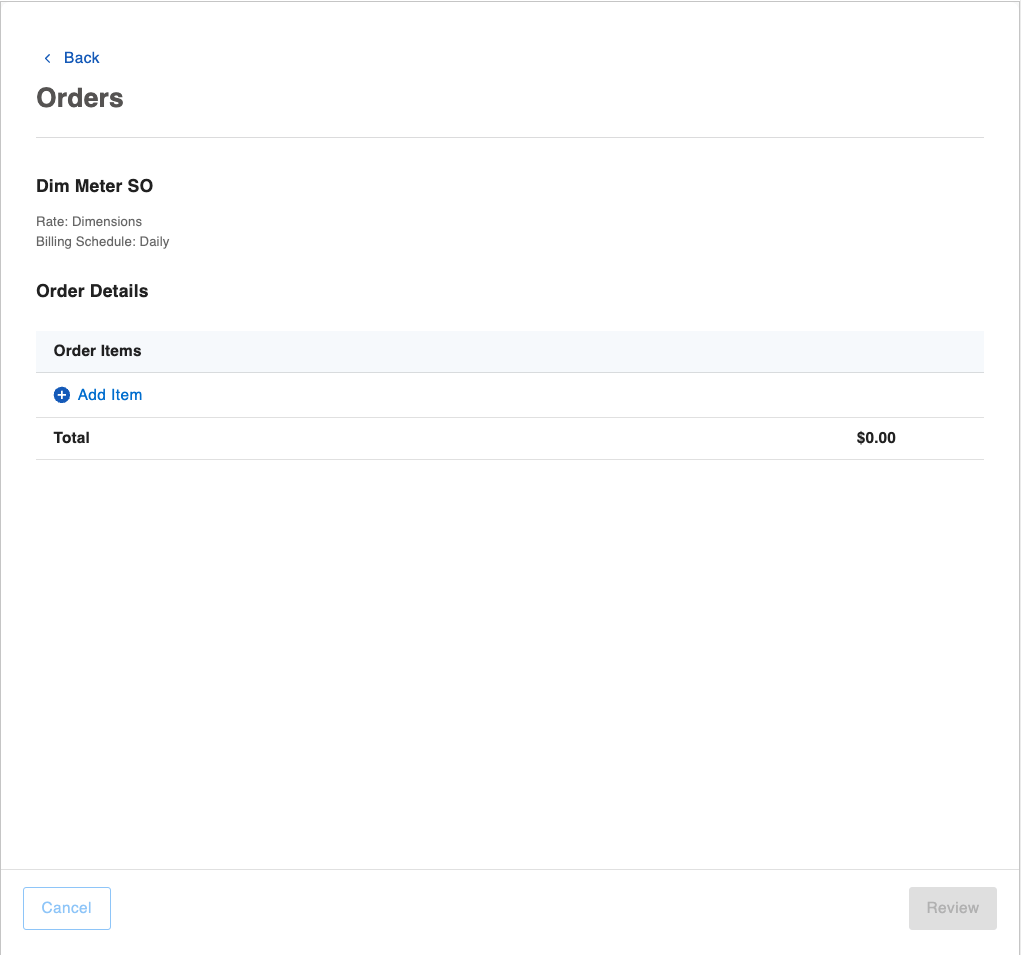


<div
  id="orderCreate"
  class="amberflo"
  data-amberflo-type="order-create"
  data-amberflo-product-item-id="65ad692f-b7ae-4886-ab8a-3d0146d0817d"
></div>

<script>
  document.getElementById("orderCreate").addEventListener("back", (event => {
    // Do something when back button is pressed. For instance:
    window.location.href = "/order-list"
  });

   document.getElementById("orderCreate").addEventListener("cancel", (event => {
    // Do something when cancel button is pressed. For instance:
    window.location.href = "/order-list"
  });
</script>
Order Usage Graph and Table
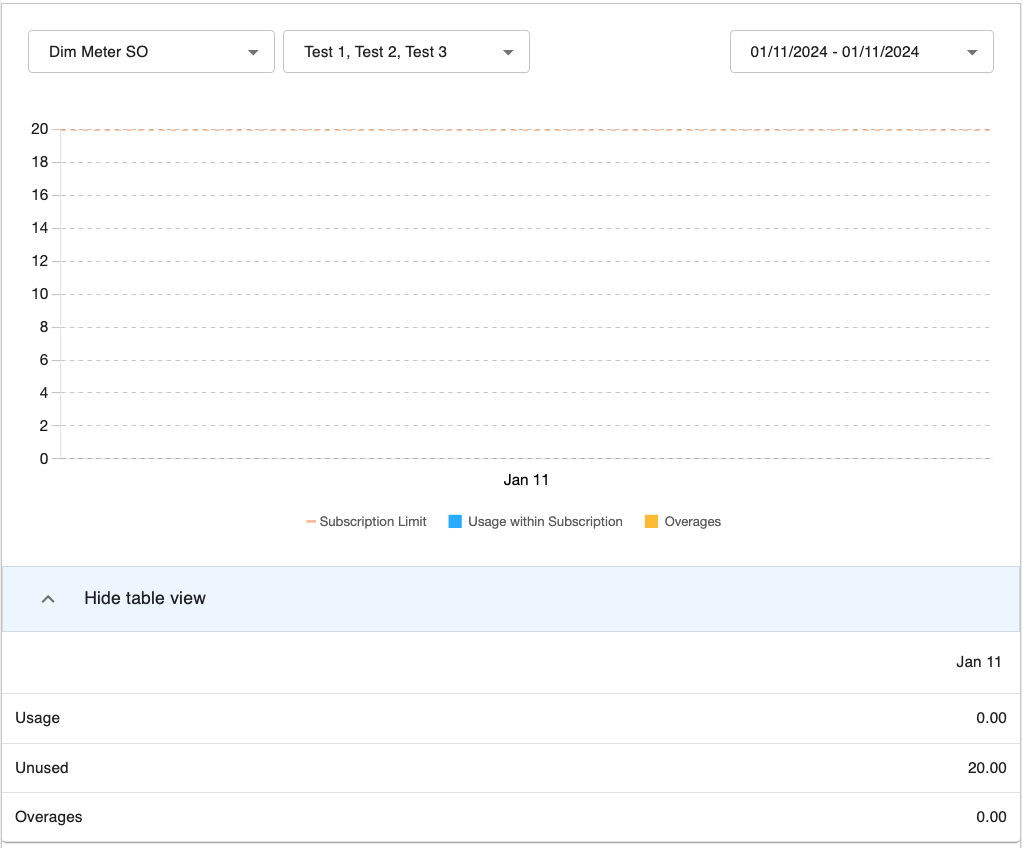


<div
  class="amberflo"
  data-amberflo-type="order-usage-graph-table"
></div>
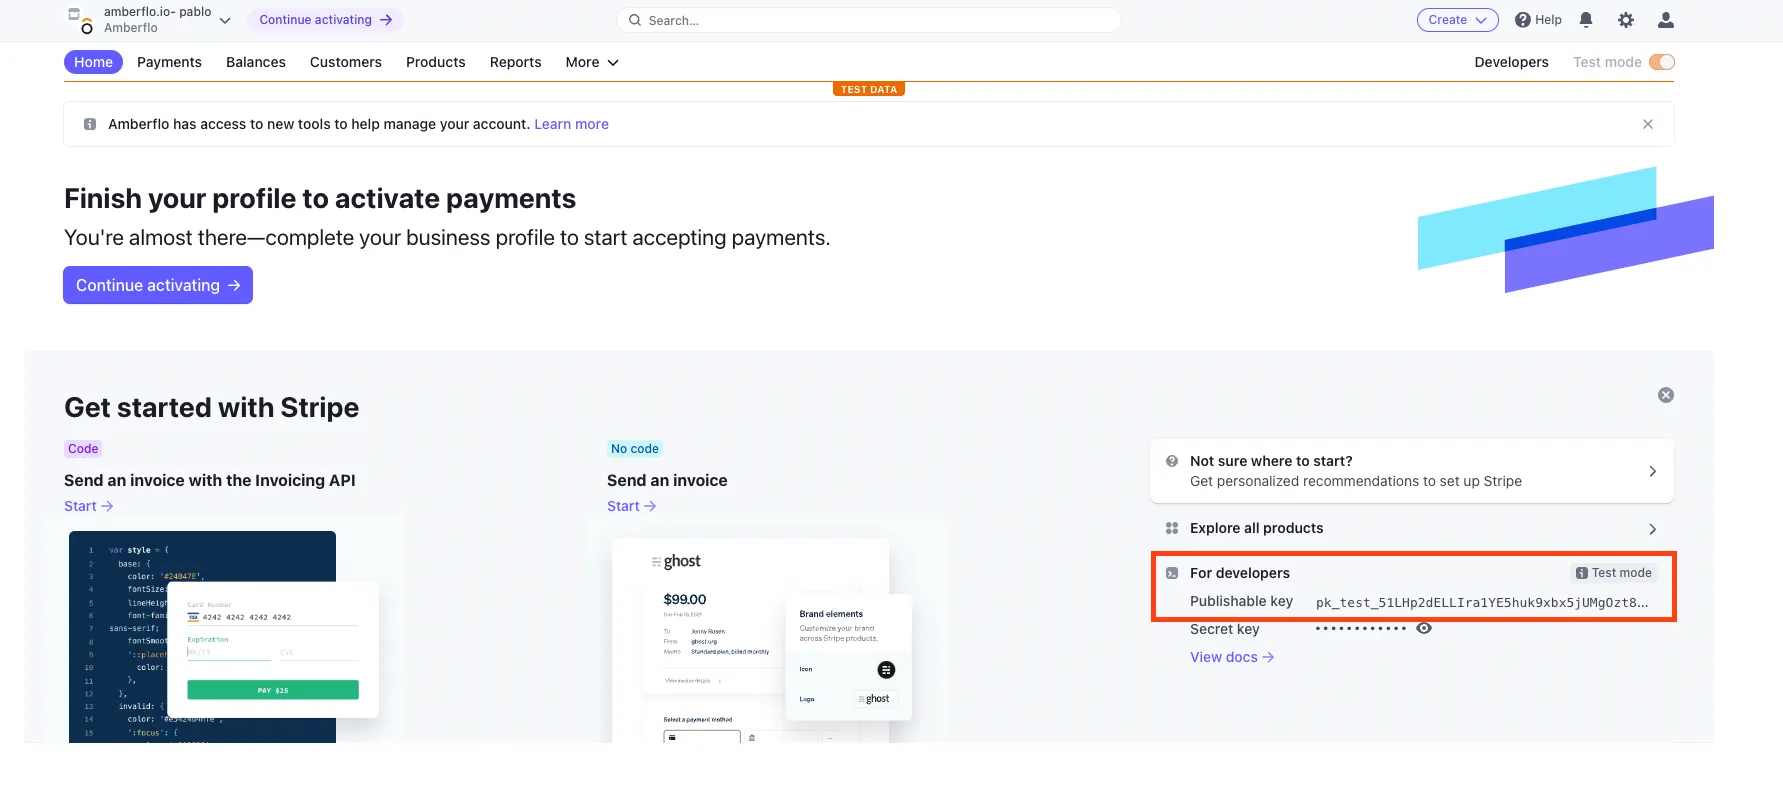
How to get the Stripe publishable key
- Once inside Stripe, go to Dashboard
- Inside the dashboard copy the publishable key. Check the image below for reference:
Appendix 1: Full Code Example
<html>
    <head>
        <script id="amberflo-script" type="module" src="https://js.amberflo.io/index.1.0.24.js"></script>
        <script>
            window.onload = () => {
                // YOU SHOULD NOT RETRIEVE A SESSION TOKEN LIKE THIS IN YOUR CLIENT-SIDE CODE.
                // THIS IS ONLY FOR DEMONSTRATION PURPOSES TO TRY OUT A QUICK WORKING EXAMPLE.
                // Please see this section (https://docs.amberflo.io/docs/uikit-sdk#get-session-token)
                // for more information on how to provide a session token to your client.
                fetch("https://app.amberflo.io/session", {
                    method: "POST",
                    body: JSON.stringify({
                        // replace customer123 with an actual customer id
                        customerId: "customer123",
                    }),
                    headers: {
                        // YOU SHOULD NOT HAVE YOUR API KEY IN YOUR CLIENT SIDE CODE.
                        // THIS IS ONLY FOR DEMONSTRATION PURPOSES TO TRY OUT A QUICK WORKING EXAMPLE.
                        // replace your_api_key with your account's API key.
                        // Please see this section for more info.
                        // (https://docs.amberflo.io/docs/uikit-sdk#get-session-token)
                        "x-api-key": "your_api_key"
                    },
                })
                .then((response) => response.json())
                .then((responseJson) => {
                    amberflo = new AmberfloSDK(responseJson.sessionToken);

                    // This is an example of using an event.
                    // This will log the date info when changing the date on the usage graph using the date picker.
                    document
                    .getElementById("usage-graph")
                    .addEventListener("datechange", (event) => {
                        console.log(event.detail);
                        // { startDate: 1674000000000, endDate: 1676603751569 }
                    });
                });
            };
        </script>
    </head>

    <body>
        <!-- replace meter-api-name with actual meter API Name -->
        <div
            id="usage-graph"
            class="amberflo meter"
            data-amberflo-type="usage-graph"
            data-amberflo-meter="meter-api-name"
        ></div>
        <div
            id="usage-table"
            class="amberflo"
            data-amberflo-type="usage-table"
            data-amberflo-with-container="true"
            data-amberflo-with-title="true"
            data-amberflo-title="Usage Table"
        ></div>
    </body>
</html>